Beginners guide to customize layout in Magento2

It’s difficult for a beginner to go into Magento developer docs and understand the whole concept of layout handling with xml files. The layout files are .xml files located in the layouts folder of the theme/component.
The layout file defines the position, template file, arguments, html attributes, etc. for each block. A template file (with .phtml extension) is the HTML part that is loaded by how the XML is configured.
Magento has this feature to turn on template path hints which is an absolute lifesaver for beginners who try to figure out which template is used for a particular section. It also gives the block class name used. Below is an image of Magento showing the path hints.

Here, we can see that the cart image is displayed from the minicart.phtml in the checkout module.
Customizing Layouts
You can add, modify, or remove a block and its sub-elements. Firstly, find the name of the parent element/ block you want to modify.
- To update a block use the <referenceBlock>, which means which block it refers to.
Example: to pass an image to the logo block./** * layout xml */ <referenceBlock name="logo"> <arguments> <argument name="logo_file" xsi:type="string">images/logo.png</argument> </arguments> </referenceBlock> <span id="mce_marker" data-mce-type="bookmark"></span>Example 2: to add a new block to the top.links section
/**
 * Layout update
 */

 <referenceBlock name="top.links">
	<block class="Magento\Framework\View\Element\Template" name="top.search" as="topSearch" after="-" template="Magento_Search::form.mini.phtml" />
</referenceBlock>
- The <remove> attribute is optional and its default value is false. This removes the block if set to true.
/** * Layout update */ <referenceBlock name="block.name" remove="true" /><span id="mce_marker" data-mce-type="bookmark"></span>
Example:
/** * Layout update */ <referenceBlock name="div.sidebar.additional" remove="true"/><span id="mce_marker" data-mce-type="bookmark"></span>
- The <display> attribute is optional and its default value is true. This hides the block if set to false.
/** * Layout */ <referenceBlock name="block.name" display ="false" /><span id="mce_marker" data-mce-type="bookmark"></span>
Example:
/** * Layout */ <referenceBlock name="product.info.stock.sku" display="false"/><span id="mce_marker" data-mce-type="bookmark"></span>
- The <move> Sets the declared block or container element as a child of another element in the specified order.
/** * Layout */ <move element="name.of.an.element" destination="name.of.destination.element" as="new_alias" after="name.of.element.after" before="name.of.element.before"/><span id="mce_marker" data-mce-type="bookmark"></span>
- <before> and <after> attributes of <block>: Used to position the block before/after an element under the same parent. The element name or alias name is specified in the value. Use dash (-) to position the block before/after all other elements of its level of nesting. These attributes are optional.
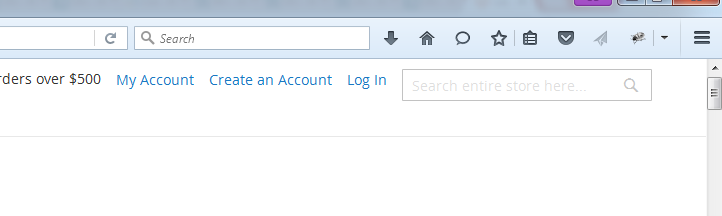
 For example in the above screenshot if you want to move the search box to the top “header.links” section, add this line in your custom layout file.
/** * Layout */ <move element="top.search" destination="header.links" after="-" /><span id="mce_marker" data-mce-type="bookmark"></span>
Then the result will be as below.
Hope this gives a basic idea of layout handling for beginners. Drop us any questions you may have.
Leave a Reply