Greetings! I'm Aneesh Sreedharan, CEO of 2Hats Logic Solutions. At 2Hats Logic Solutions, we are dedicated to providing technical expertise and resolving your concerns in the world of technology. Our blog page serves as a resource where we share insights and experiences, offering valuable perspectives on your queries.

Quick Summary
Magento headless implementation separates your frontend from Magento’s backend, communicating via APIs. This approach delivers faster page loads, better customization options, and future-proof architecture.
Key steps include:
- Assess your current setup
- Choose a frontend technology (Next.js recommended)
- Set up GraphQL APIs
- Develop your frontend
- Establish CI/CD pipelines
- Migrate and test thoroughly
- Launch and continuously optimize
Expect improved performance, higher conversion rates, and greater development agility post implementation.
Have you ever stared at your Magento store wondering why it feels so 2015? You’re not alone.
Many e-commerce businesses are struggling with the limitations of traditional Magento setups while watching competitors zoom ahead with lightning-fast, customizable shopping experiences.
We, at 2Hats Logic, have been helping dozens of businesses untangle their monolithic Magento architecture and transform it into a flexible headless system that can adapt to whatever the market throws at them next.
In this guide, we will walk you through the process we use at 2HatsLogic to implement headless Magento solutions that deliver real results.
What is Headless Magento (And Why Should You Care)?
Headless commerce separates your frontend (what customers see) from your backend (your product database, inventory management, etc.). Instead of these components being tightly coupled, they communicate via APIs.
For Magento specifically, going headless means you continue using Magento’s robust backend features while replacing its frontend with more flexible, modern technologies.
Why make the switch?
- Speed: Traditional Magento sites often struggle with load times. Headless implementations using modern JavaScript frameworks can reduce page load times.
- Flexibility: Want to sell across multiple channels? Headless lets you push content to websites, mobile apps, kiosks, and IoT devices from a single backend.
- Developer Experience: Attract better talent with modern tech stacks that developers want to work with.
- Future-Proofing: Add new touchpoints or technologies without rebuilding your entire system.
Pro Tip: Before starting your headless journey, document all your current customizations and extensions. Not all will transition smoothly to a headless implementation, and this inventory will save significant time later.
Traditional vs. Headless Magento: What’s the Difference?
Take a look at the basic difference between Traditional and Headless Magento:
| Aspect | Often, slower page loads | Headless Magento |
|---|---|---|
| Architecture | Monolithic (frontend and backend tightly coupled) | Decoupled (frontend and backend separate) |
| Frontend Flexibility | Limited to Magento themes | Any frontend technology (React, Vue, Next.js, etc.) |
| Performance | Often slower page loads | 40-60% faster loading times |
| Customization | Requires PHP knowledge, often complex | Uses modern JavaScript frameworks, more developer-friendly |
| Maintenance | Single system to maintain | Multiple systems requiring coordination |
Step-by-Step Implementation Guide for Magento Headless
Transform your Magento store with our proven seven-step headless implementation process that delivers faster performance and unlimited flexibility.
Step 1: Assess Your Current Magento Setup
Before making any changes, take stock of what you have:
- Which Magento version are you running? (2.3+ is recommended for headless)
- What custom extensions and integrations do you use?
- What are your performance pain points?
- Which frontend features are most important to your customers?
Real-world example: When implementing a headless solution for a fashion retailer, we discovered they had 23 custom extensions. After analysis, we found only 17 were still actively used, which simplified our migration considerably.
Step 2: Choose Your Frontend Technology
Your frontend choice depends on your specific needs:
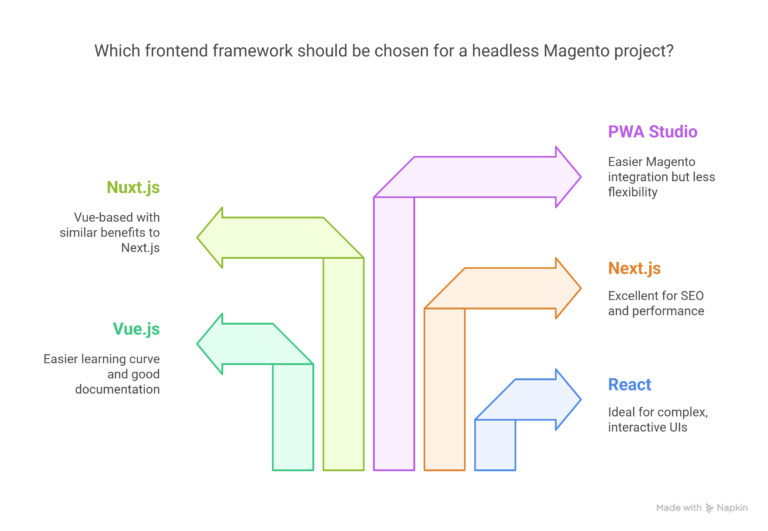
- React: Great for complex, interactive UIs
- Vue.js: Easier learning curve, good documentation
- Next.js: Excellent for SEO and performance (our most common recommendation)
- Nuxt.js: Vue-based framework with similar benefits to Next.js
- PWA Studio: Magento’s solution (easier integration but less flexibility)
At 2HatsLogic, we typically recommend Next.js for most Magento headless projects due to its SEO benefits, performance optimizations, and robust ecosystem.
Unsure which frontend technology is right for your Magento headless implementation?
Step 3: Set Up Your API Infrastructure
The communication layer between your frontend and Magento backend is crucial:
- GraphQL is your friend: Magento 2.3+ has built-in GraphQL support, which is more efficient than REST for e-commerce use cases
- Configure authentication: Set up OAuth or JWT for secure API access
- Optimize query patterns: Design efficient queries to reduce load times
- Implement caching: Use Redis or Varnish to cache API responses
Step 4: Develop Your Headless Frontend
With your API layer established, now you can build your frontend:
- Create component library: Build reusable UI components (product cards, cart items, etc.)
- Implement routing: Set up frontend routing that matches your current URL structure for SEO
- Build product pages: Create dynamic product detail pages pulling data from GraphQL
- Develop cart and checkout: Often the most complex part, requiring careful testing
- Handle user accounts: Build login, registration, and account management features
Our agency typically starts with the product listing and detail pages, then moves to cart functionality, and finally tackles checkout and user accounts.
Step 5: Set Up a Continuous Integration/Continuous Deployment Pipeline
A solid CI/CD pipeline is essential for a headless architecture:
- Choose a CI/CD platform (GitHub Actions, CircleCI, Jenkins)
- Set up automated testing
- Configure staging environments
- Create deployment workflows for both the frontend and the backend
- Implement monitoring and alerts
This step is often overlooked but is critical for maintaining stability as your frontend and backend evolve independently.
Pro Tip: Set up performance monitoring from day one of your headless implementation. Tools like Lighthouse CI can automatically flag performance regressions before they reach production.
Step 6: Migrate Content and Test
With your infrastructure in place:
- Data migration: Transfer any CMS content to your new frontend
- Test across devices: Ensure responsive design works across all screen sizes
- Performance testing: Verify improved load times
- User testing: Get real feedback from actual users
- SEO verification: Check that page indexing and rankings are maintained
We recommend running your headless frontend in parallel with your existing storefront initially, perhaps at a subdomain like new.yourstore.com, to compare and fine-tune before going live.
Step 7: Launch and Optimize
Ready for launch:
- Update DNS settings
- Implement redirects for changed URLs
- Monitor analytics and error logs closely
- Be prepared to roll back if necessary
- Gradually ramp up traffic to the new system
After launch, the real work begins:
- Use A/B testing to optimize the new frontend
- Leverage your newfound agility to rapidly iterate
- Continue performance optimization
Common Challenges and Solutions in Magento Headless Implementation
Magento headless implementation comes with common challenges, each with practical solutions—which are discussed here to help ensure a smooth switch.
Challenge 1: Performance Bottlenecks in API Calls
When we implemented a headless solution for an electronics retailer, their category pages with 100+ products were making too many API calls.
Solution: We implemented data aggregation at the API level and edge caching with Cloudflare, reducing API calls by 65% and cutting page load time from 3.2s to 1.1s.
Challenge 2: SEO Concerns
A common worry is losing SEO equity during the transition to headless.
Solution: Implement server-side rendering (SSR) or static site generation (SSG), maintain your URL structure, and create a comprehensive redirect map for any changed URLs.
Challenge 3: Complex Checkout Flows
One client had a multi-step checkout with custom shipping logic.
Solution: We built a modular checkout component library with state management using Redux, allowing us to preserve all custom logic while improving the UX.
Challenge 4: Extension Compatibility
Many Magento extensions aren’t designed for headless architectures.
Solution: Audit extensions early and either find API-compatible alternatives or build custom microservices to replace critical functionality.
Ready to overcome these common headless Magento challenges?
The Results: What to Expect After Going Headless with Magento
From our experience implementing headless Magento for dozens of clients, here’s what you can realistically expect:
- Performance Improvement: Average page load time reduction of 40-60%
- Conversion Rate Increase: Typically 15-30% improvement due to better UX
- Development Velocity: New features can be implemented 2-3x faster
- Mobile Experience: Dramatically improved mobile metrics, especially Core Web Vitals
Ready to Transform Your Magento Store?
If you’re considering a headless implementation for your Magento store, we’d love to help. At 2HatsLogic, we’ve guided dozens of e-commerce businesses through successful headless transformations, resulting in faster sites, happier customers, and more flexible architecture.
Our team brings both technical expertise and business strategy to every project, ensuring your investment delivers real ROI.
Book a free 30-minute consultation to discuss your specific needs and see if a headless approach is right for your business. We’ll provide an honest assessment and outline potential next steps, no obligation.
Let’s build an e-commerce experience that will keep you competitive for years to come.
FAQ
How long does a typical Magento headless implementation take?
For a mid-sized store, expect 3-6 months from planning to launch. Larger, more complex stores may take 6-12 months.
Can we implement headless incrementally, or is it all-or-nothing?
Yes! We often recommend starting with product pages or a specific section of your site, then expanding. This approach reduces risk and allows for easier testing.
Will our team need new skills to maintain a headless implementation?
Yes, you'll need frontend developers familiar with your chosen framework (React, Vue, etc.) and backend developers who understand API-driven architecture. Full-stack developers with both skills are increasingly common.
Can we use Magento's admin interface to manage content in a headless setup?
Absolutely. Your content managers will continue using the familiar Magento admin. The difference is that this content is delivered to your frontend via APIs rather than directly.
Table of contents
- What is Headless Magento (And Why Should You Care)?
- Traditional vs. Headless Magento: What's the Difference?
- Step-by-Step Implementation Guide for Magento Headless
- Common Challenges and Solutions in Magento Headless Implementation
- The Results: What to Expect After Going Headless with Magento
- Ready to Transform Your Magento Store?


Related Articles